The Windows 11 operating system from Microsoft comes with several new features for the users to customize the system. One of the features that the company has introduced is Desktop Stickers but it isn’t generally available for all the users right now.
When the desktop stickers feature is enabled, users can place stickers on their desktop and keep them there even if the desktop wallpaper is switched or replaced. Once stickers are added, users can also resize and move the stickers to other parts of their desktop.
Currently, the feature is only available to computers enrolled in the Microsoft Insider Preview program and specific machines that have installed Windows 11 build 25162 or later. Even with those builds, the new Stickers feature is still hidden and needs to be manually enabled.
In this step-by-step guide, we will show you how to enable the Desktop Stickers feature on the Windows 11-powered computer using the Registry Editor.
How to enable Desktop Stickers in Windows 11
Step 1: Open the Registry Editor tool on your computer. You can search for the application in the Start Menu or press the Windows + R keys and then enter “regedit” in the Run prompt to open the application.
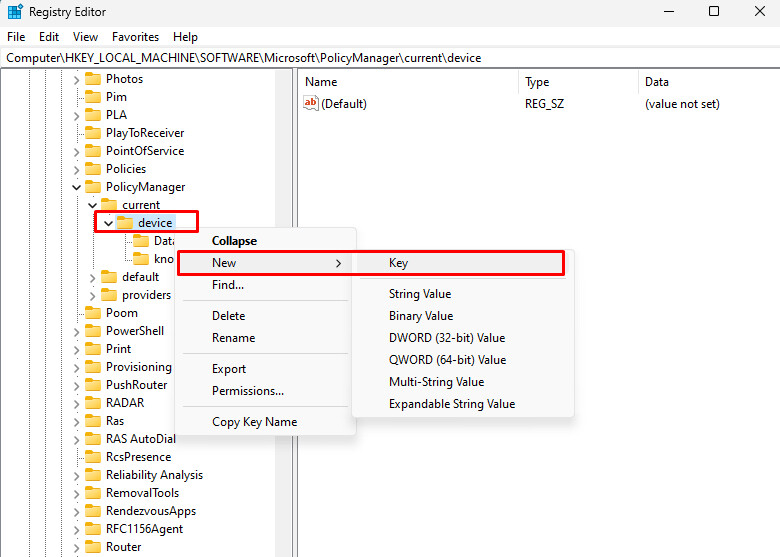
Step 2: When the Registry Editor opens, go to the following location
HKEY_LOCAL_MACHINE\SOFTWARE\Microsoft\PolicyManager\current\device
Step 3: Select the “device” directory from the left sidebar, right-click on it and then select New > Key

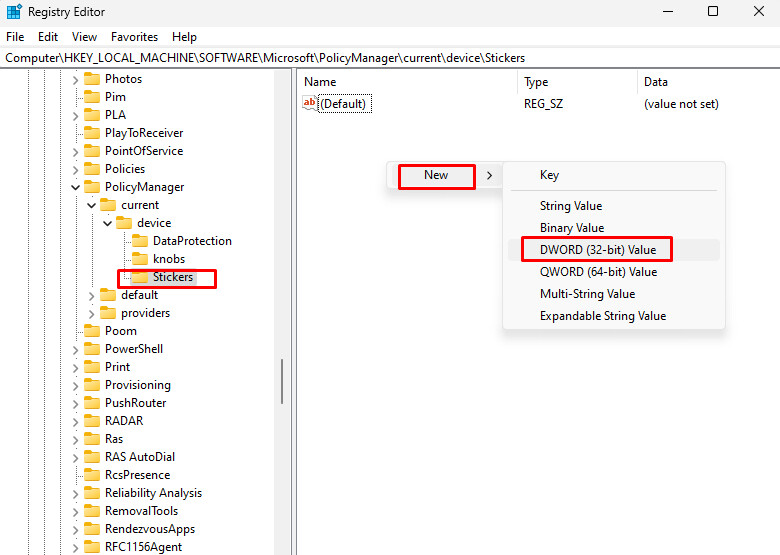
Step 4: Name the new key as “Stickers” and press the Enter key to save it.
Step 5: Select the “Stickers” folder and on the right side, right-click in the blank area and select New > DWORD (32-bit) Value.

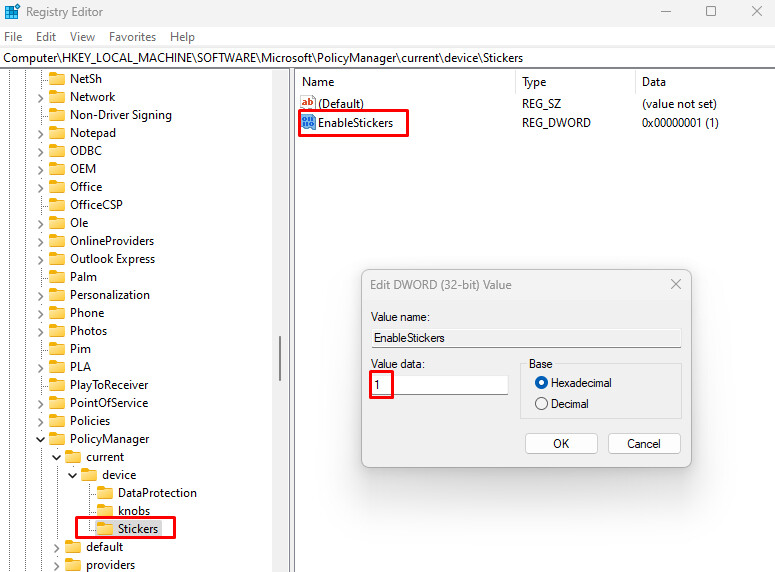
Step 6: Name the newly created key as “EnableStickers” and press the Enter key to save it.
Step 7: Open the “EnableStickers” by double-clicking on it, change the value from “0” to “1” and then click the “Ok” button.

That’s it. Restart the device after following the guide for the changes to take effect. Once you have followed the above-mentioned step-by-step guide, you have successfully enabled the Desktop Background Stickers feature on your Windows 11 computer.
To add stickers to the desktop background, open the Windows Settings application and go to Personalization and then Background and you will see an option named “Add Sticker” using which you can add a sticker to the background or the wallpaper on your Windows 11-powered computer.
