The network connection has become very crucial for any computer and it opens the gateway to the internet. The Windows 11 operating system offers to set different network profile types with specific settings to improve security or share files, printers, and other resources in the network.
There are basically three types of profiles — Private, Public, and Domain. The Private and Public are available for all computers while the Domain profile is only available when a device is joined to the domain.
In the Private profile, which is meant for trusted networks, the computer becomes discoverable and allows sharing files, printers, and other resources. On the other hand, the Public profile makes the device invisible in the local network and this type is recommended for most locations, including public places. Lastly, the Domain profile will be set automatically when the computer joins an Active Directory domain.
If you are looking for a way to change the profile type for a network that has already been set, then you are at the right place. In this step-by-step guide, we will show you how to change the network profile type using PowerShell on Windows 11 computer.
How to change network profile type using PowerShell in Windows 11
Step 1: Open the PowerShell tool on your Windows 11 computer. For this, click on the Start button and then search for “PowerShell.” From the search results, select the “Run as administrator” option for the app.
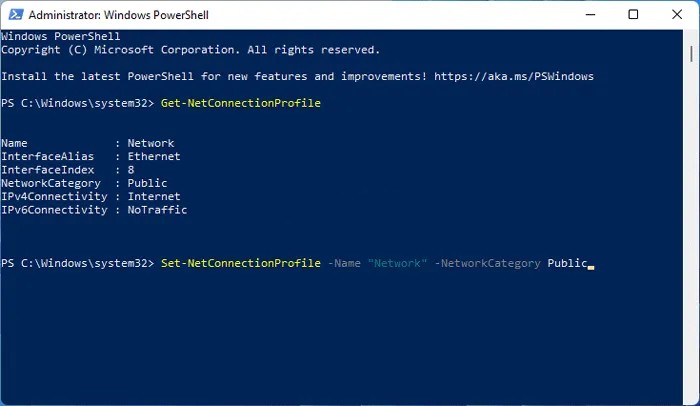
Step 2: In the PowerShell window, enter the following command:
Get-NetConnefctionProfile
Step 3: Confirm the network’s profile type in the NetworkCategory field (InterfaceAlias).
Step 4: To change the network profile type, enter the following command:
Set-NetConnectionProfile -Name "NETWORK-NAME" -NetworkCategory TYPE

Make sure that you replace the “NETWORK-NAME” in the command with the actual name of your network connection and change the “TYPE” to Private if you want to change the network profile from public to private. The command also takes the DomainAuthenticated type on a domain-joined computer.
That’s it. Once you have executed the command by following the above-mentioned steps, the settings will apply immediately to the connection and firewall settings.

