Microsoft’s Windows operating system comes with a very powerful internal tool named PowerShell. It is basically an advanced version of the Command Prompt and can be used to customize the Windows system through commands.
While there are many advanced use cases for the PowerShell tool in Windows, it can also be used to carry out some not-so-important tasks, like formatting a drive, which can also be done through the Disk Management tool and a few other ways.
In this step-by-step guide, we will show you how to format the drive on your Windows computer using PowerShell commands.
How to format the drive using PowerShell in Windows 11
Step 1: Open the Start menu and search for “PowerShell” and from the search results, right-click on the app and select the “Open as administrator” option.
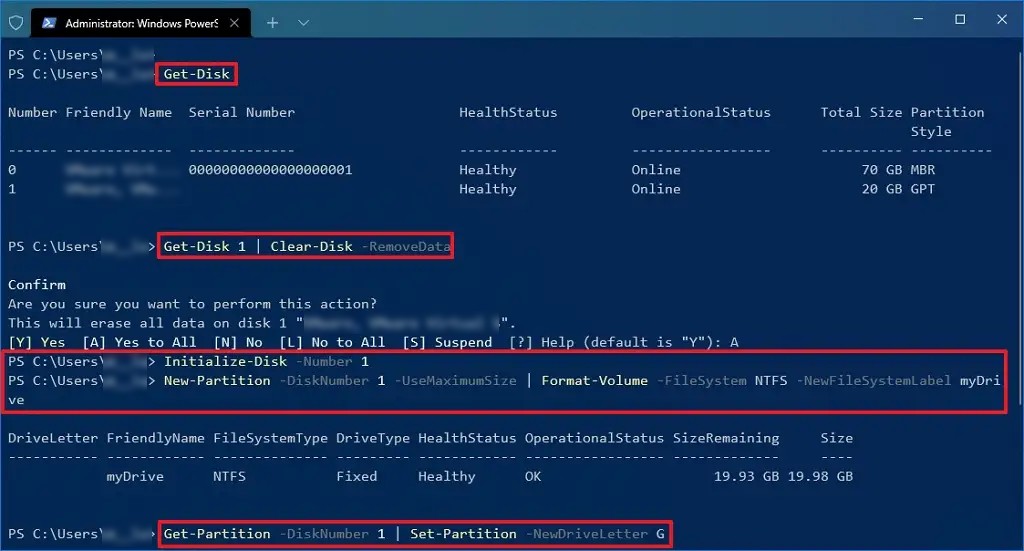
Step 2: When the PowerShell opens, enter the following command to identify the drive to repair:
Get-Disk
Step 3: To wipe out the drive on your computer, enter the following command:
Get-Disk 1 | Clear-Disk -RemoveData
Make sure that you change the number “1” in the above command with the actual number of the drive on your computer that you want to wipe. Specifying an incorrect number will wipe out data from the wrong drive, resulting in data loss.
Step 4: After that, enter the following command to initialize the disk with the default GUID Partition Table (GPT):
Initialize-Disk -Number 1
In this command also, change the number “1” with the drive you want to format.
Step 5: To format and create a new partition on the drive, use the following command:
New-Partition -DiskNumber 1 -UseMaximumSize | Format-Volume -FileSystem NTFS -NewFileSystemLabel myDrive
As mentioned previously, change the number “1” with the actual drive number and change “myDrive” to the name you want to use.
Step 6: To assign a drive letter to the disk, you need to the enter the following command:
Get-Partition -DiskNumber 1 | Set-Partition -NewDriveLetter G
In the command, change the number “1” with the actual drive number and change “G” with the letter you want to assign to the drive.

That’s it. Following the above-mentioned steps will format the drive and create a new partition, all using the PowerShell tool on your Windows computer.
