In the macOS, you can easily convert images in bulk using the Preview application on your system. However, if you work constantly requires you to convert images, then you can create a Folder Action which can get the job done quickly and easily.
This guide will show you a step-by-step process on how you can do this. For this, we will be using Folder Action that will automatically convert images dropped into the folder to your desired extension. That too without the need for you to open the image in any application.
Guide to create auto image converting folder in your Mac
Step 1: Open the “Automator” application on your system. You can do so by going to the Applications folder or from the Launcher. You can also press Command + Space bar and type in Automator in the Spotlight Search to open the app.
Step 2: When the application opens, select the “New Document” button from the top-left corner.
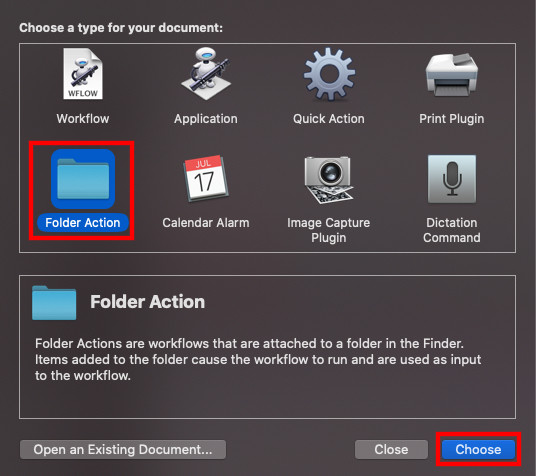
Step 3: It will now ask you to choose the type of document. From the given options, click on “Folder Action” and then click on “Choose” at the bottom-right corner.
Step 4: At the top of the workflow area, click the dropdown next to “Folder Action receives files and folders added to:” and then select “Other…”.

Step 5: Now, select the folder that you would like to attribute the image conversion process.
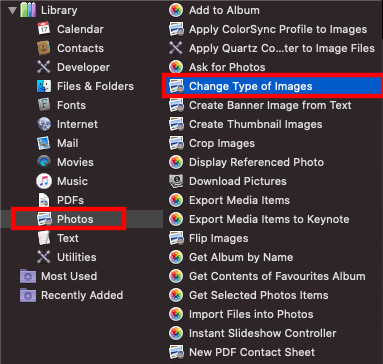
Step 6: From the Library option in the sidebar on the far left, select “Photos”.
Step 7: From the Actions column, drag “Change Type of Images” to the workflow area on the right side.

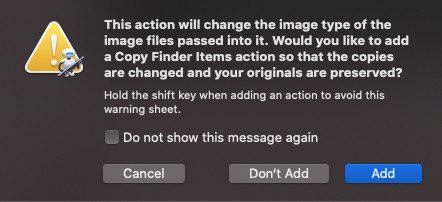
Step 8: You will now be asked if you want your action to convert copies of images placed in the folder and preserve the originals, select “Add”. If you want it to convert the original images, select “Don’t Add”.

Step 9: In the Change Type of Images action panel, choose the type of format that you want images to be converted to. Here, we are selecting JPG.

Step 10: Now in the menu bar, select File > Save… or press Command-S. Name the file action to whatever you like and then click on “Save”.
That’s it. Now, whenever you want to convert an image to JPG format, just drag and drop the file into this folder and the process will be automatically done. You can also do the same using other actions, such as “Quick Action” and “Applications”. More about that will be covered in upcoming guides.
We have written a lot of guides related to Windows 10, macOS, Android, iOS, Chromebooks, among others. So, make sure to check out our Guides section for more of such helpful guides and tips.
